Table of Contents
Table of Contents
- Section 1: Accessing Your Account
- Section 2: Home Page Overview
- Section 3: Audio and Visual Settings
- Section 4: Placing an On-Demand Video Call
- Section 5: Waiting for a Video Interpreter
- Section 6: Video In-Call Screen and Meeting Controls
- Section 7: Disconnections Caused by Internet Speed (Bandwidth)
- Section 8: Placing an On-Demand Audio Call
- Section 9: Waiting for an Audio Interpreter
- Section 10: Audio In-Call Screen and Meeting Controls
- Section 11: Adding a Third Party to an Audio-Only Call
- Section 12: Scheduling an Audio or Video Call
- Section 13: Connecting to Your Scheduled Video Call
- Section 14: Connecting to Your Scheduled Audio Call
- Section 15: Survey Screen
- Section 16: Settings Menu
- Appendix A: How to Dial Out to a Third Party.
Section 1: Accessing Your Account
Section 1: Accessing Your Account
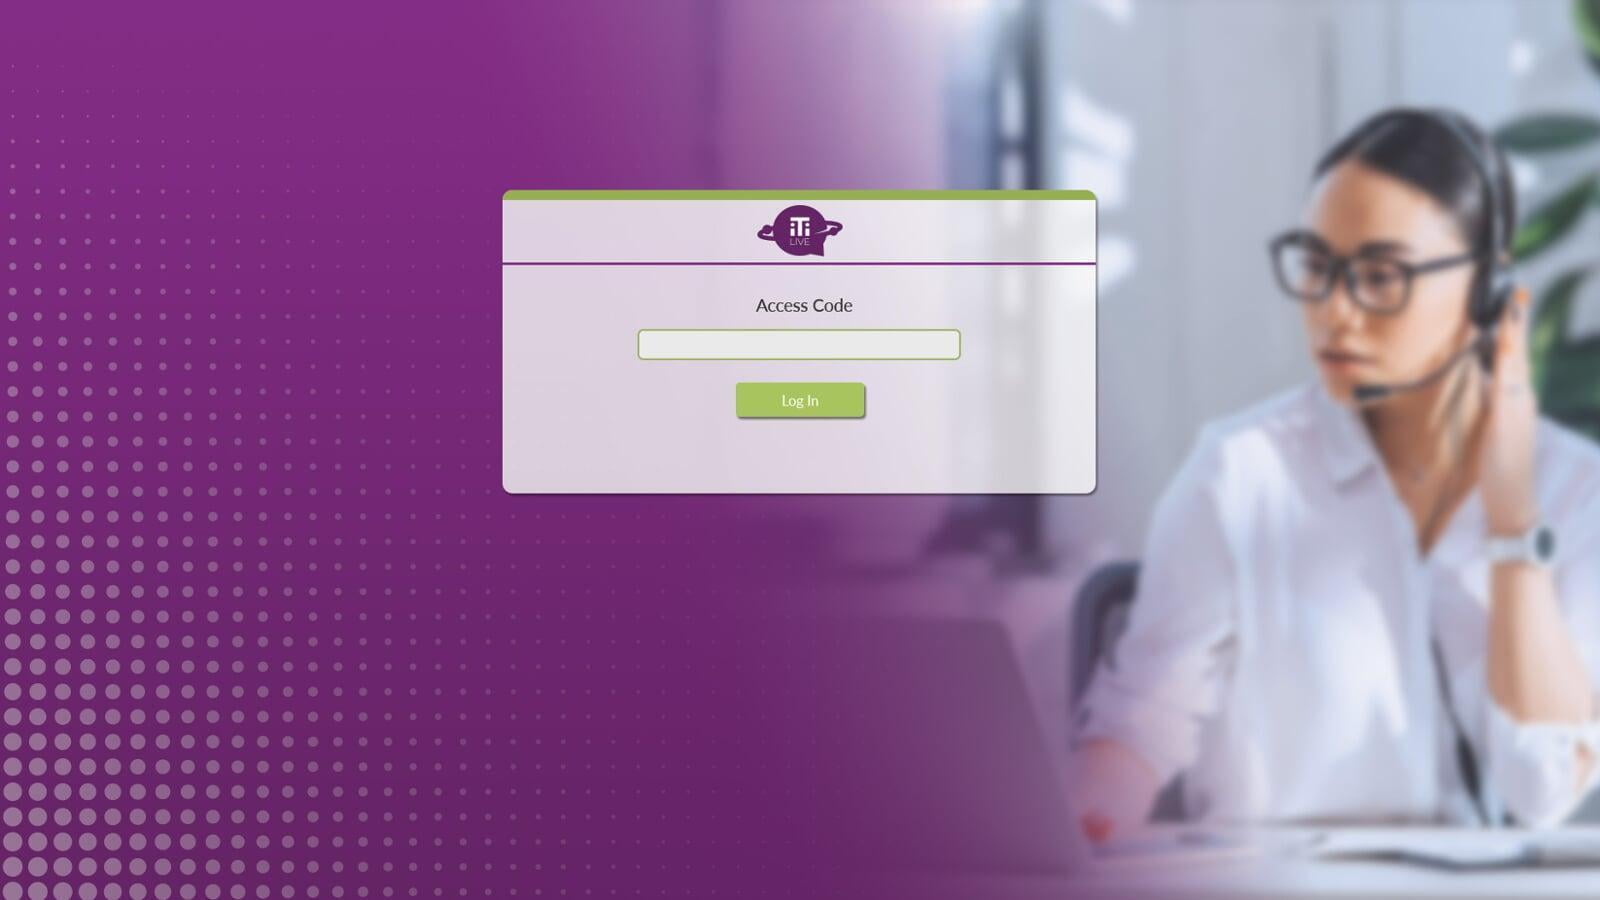
- Visit your iTiLive “Log In” page.
- Enter your Access Code and click Log In
Note: If you don’t know your Access Code, please contact your account administrator.
- If this is the first time your computer is accessing iTi Live, the site will ask for your permission to access your microphone and camera. Click Allow.
Section 2: Home Page Overview
Section 2: Home Page Overview
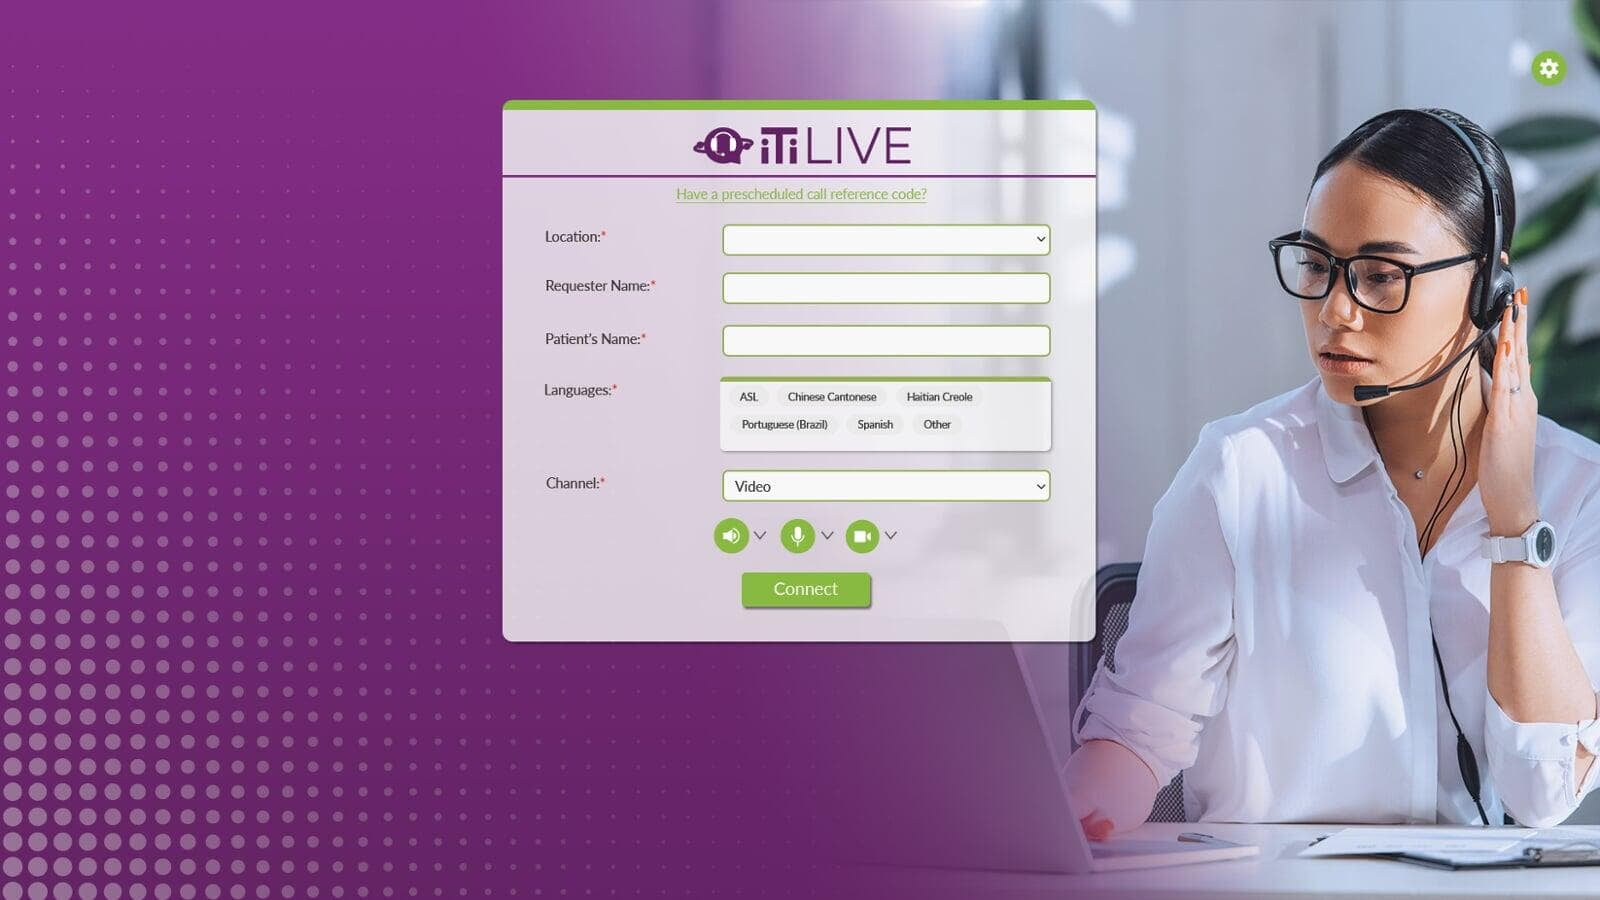
Once logged in, your “Home” screen (sometimes referred to as the “Billing” screen) will display the following fields: Organizational Information, Languages, Channel, and Schedule.
Organizational Information
Organizational Information
Between 1 and 5 fields at the top of the screen will be set by your organization. This information is customized per organization and may not match the example shown.
Languages
Languages
The Languages field allows you to choose the language for which you need an interpreter.
The five language titles listed in the box are set by your VRI administrator.
Other Languages
Other Languages
If your language is not listed as a tile, selecting Other will reveal the “Other Languages” dropdown. The “Other Languages” dropdown lists all the languages available for video.
Note: The Other 200+ Languages are only available over audio.

Channel
Channel
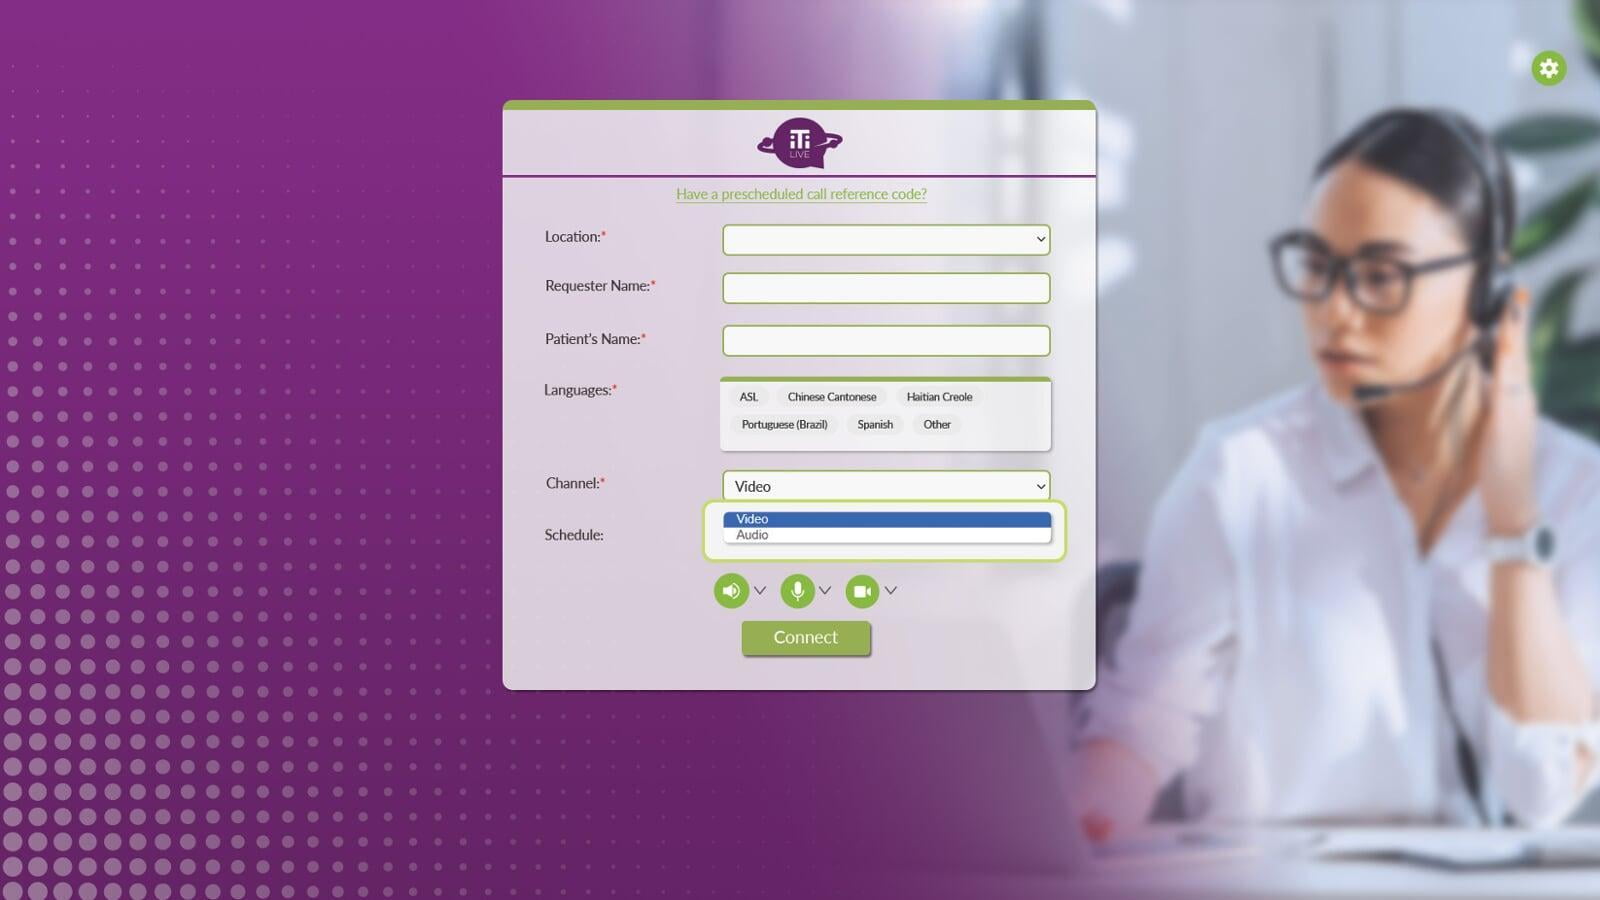
Choose between a Video or Audio Call under Channel.
Schedule
Schedule
The Schedule field allows users to schedule a Video or Audio call through the platform. It is optional. See Section 12 for more details about the Schedule feature.

Section 3: Audio Visual Settings
Section 3: Audio Visual Settings
Below the fillable fields are settings for your Speaker, Microphone, and Camera.
- Click an icon to mute its functionality; the icon will turn red.
- Click the icon again to return its functionality; the icon will turn green


Speaker
Speaker
Your speaker allows you to hear other people in an active session.

- Click the arrow to review the speaker options.
- Click the arrow under Select Speaker to change your audio output.
- The Volume slider adjusts the volume on your speakers.
- Test your speaker and volume level by clicking the Test button to play a demo sound.
- Click OK to close the speaker options.
Microphone
Microphone
Your microphone allows others to hear you during an active session.

- Click the arrow to review the microphone options.
- Click the arrow under Select Microphone to change your input device.
- Speak into your microphone, and watch for the blue dots to rise and fall with your voice. This indicates your microphone is working properly.
- Click OK to close the microphone options.
Camera
Camera
Your camera allows others to see you in an active video session.
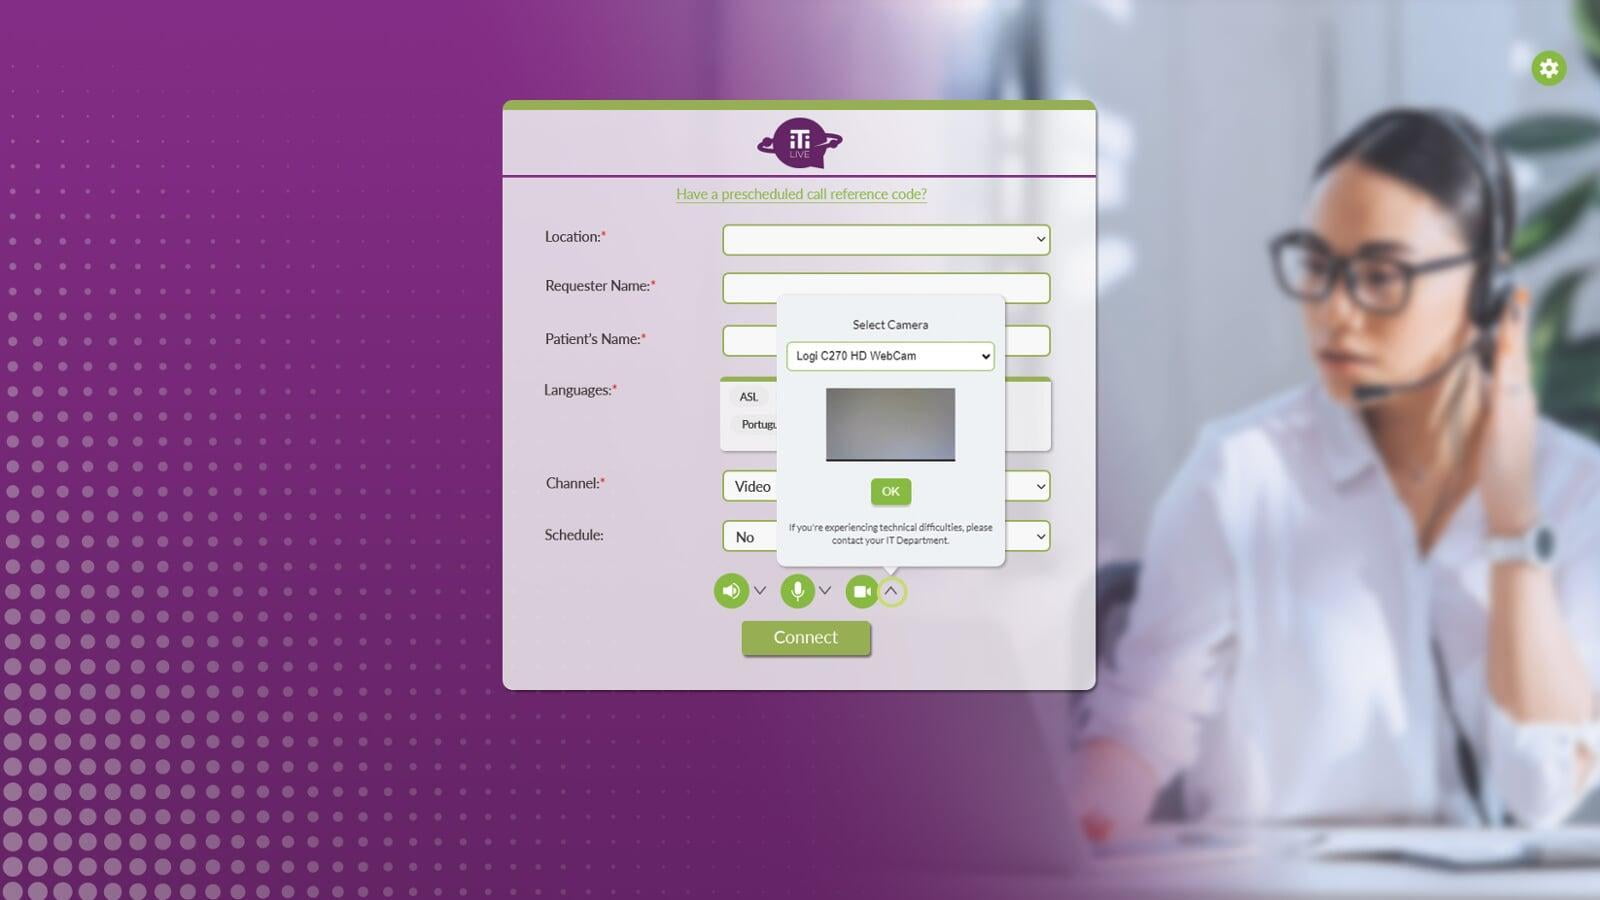
- Click the arrow to review the camera options.
- Click the arrow under Select Camera to switch to a different camera.
- Click OK to close the camera options.
Section 4: Placing an On-Demand Video Call
Section 4: Placing an On-Demand Video Call
- Fill in the required Organizational Information (the first 1 to 5 fields).
- Select the Language for which you need an interpreter from the language tiles, or click Other to reveal additional video languages under the “Other Languages” dropdown.
Note: If a language is not listed as a tile or under the dropdown, it is not eligible for video calls. All languages are available for audio-only calls. Other 200+ Audio Languages are audio-only languages.
- Click the down arrow in the Channel field, and select Video.
- The default for the Schedule field is No. If you’d like to schedule a call, select Yes. Please see Section 12 for further details on scheduled calls.
- Press Connect, and the system will start looking for a video interpreter.
Note: If the Connect button is grayed out, you still have required fields you need to fill in before the system can connect you.
Section 5: Waiting for a Video Interpreter
Section 5: Waiting for a Video Interpreter
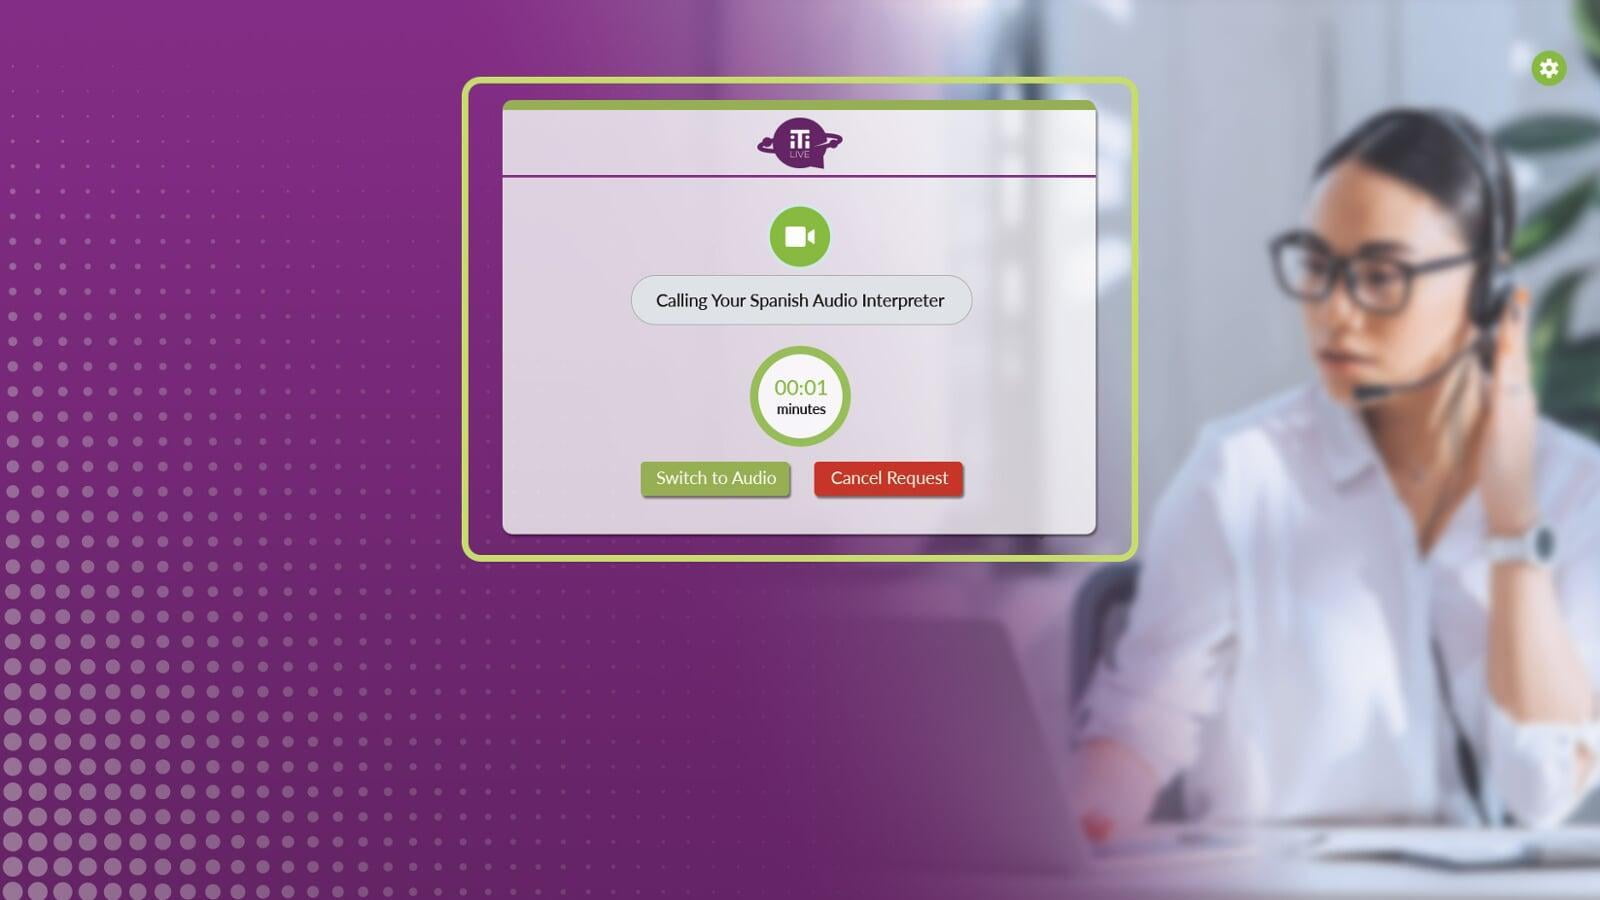
Once you’ve made your request for an interpreter, the system will reach out to all available video interpreters in the requested language.
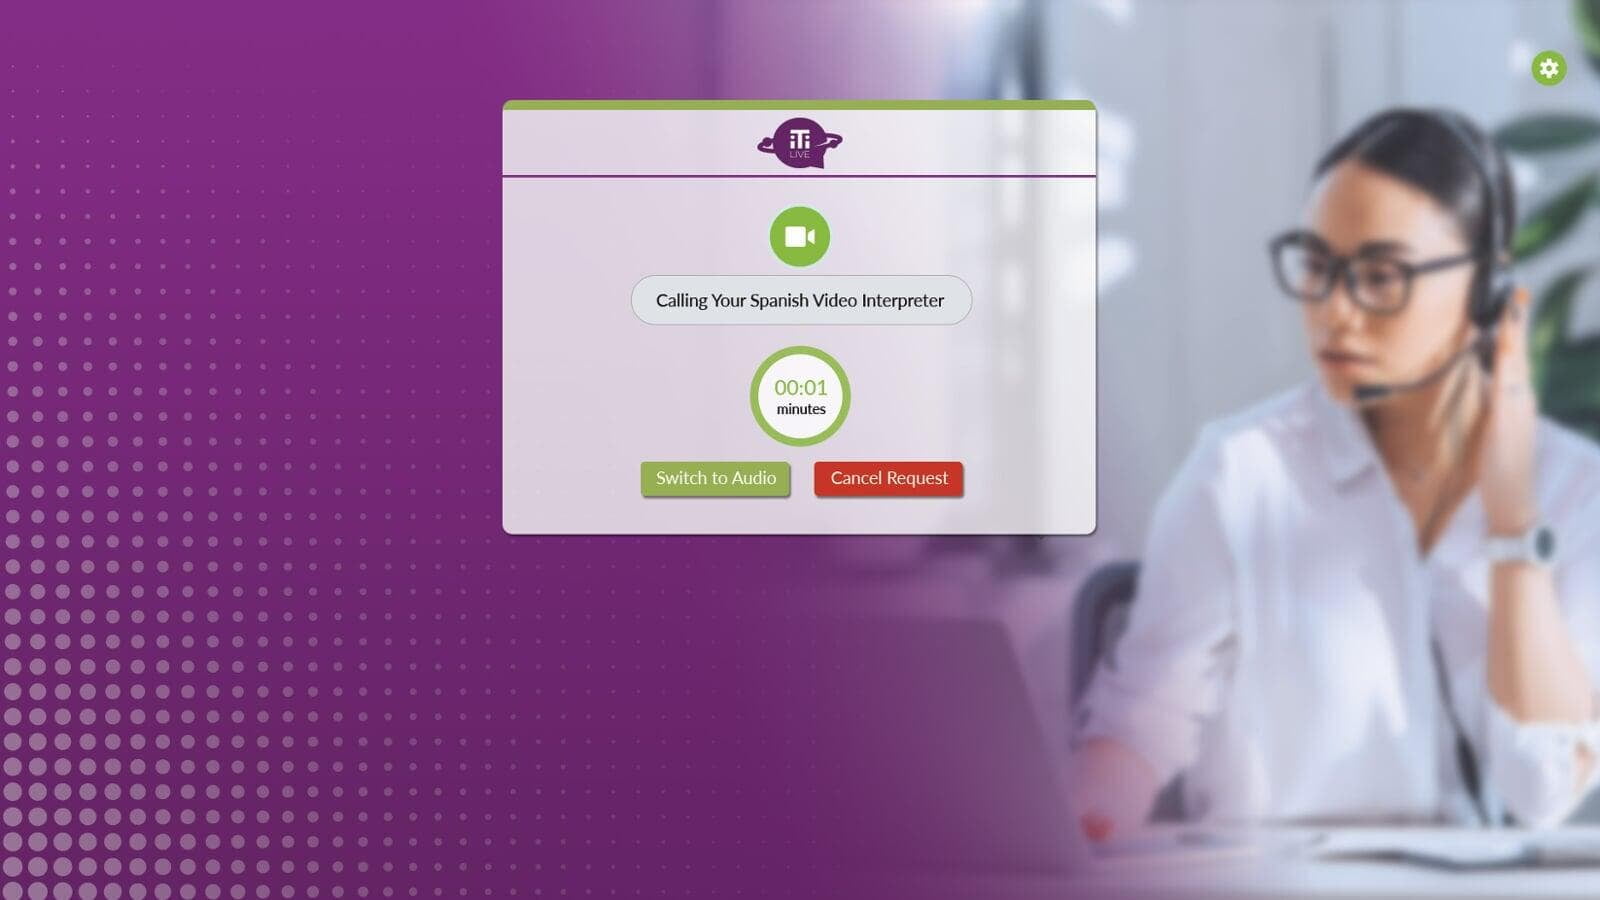
Once an interpreter accepts the call, you’ll automatically be placed into the in-call video session. If an interpreter does not immediately connect, you can continue to wait for one to connect. You also have the option to Switch to Audio or Cancel Request at any time.
Section 6: Video In-Call Screen and Controls
Section 6: Video In-Call Screen and Controls
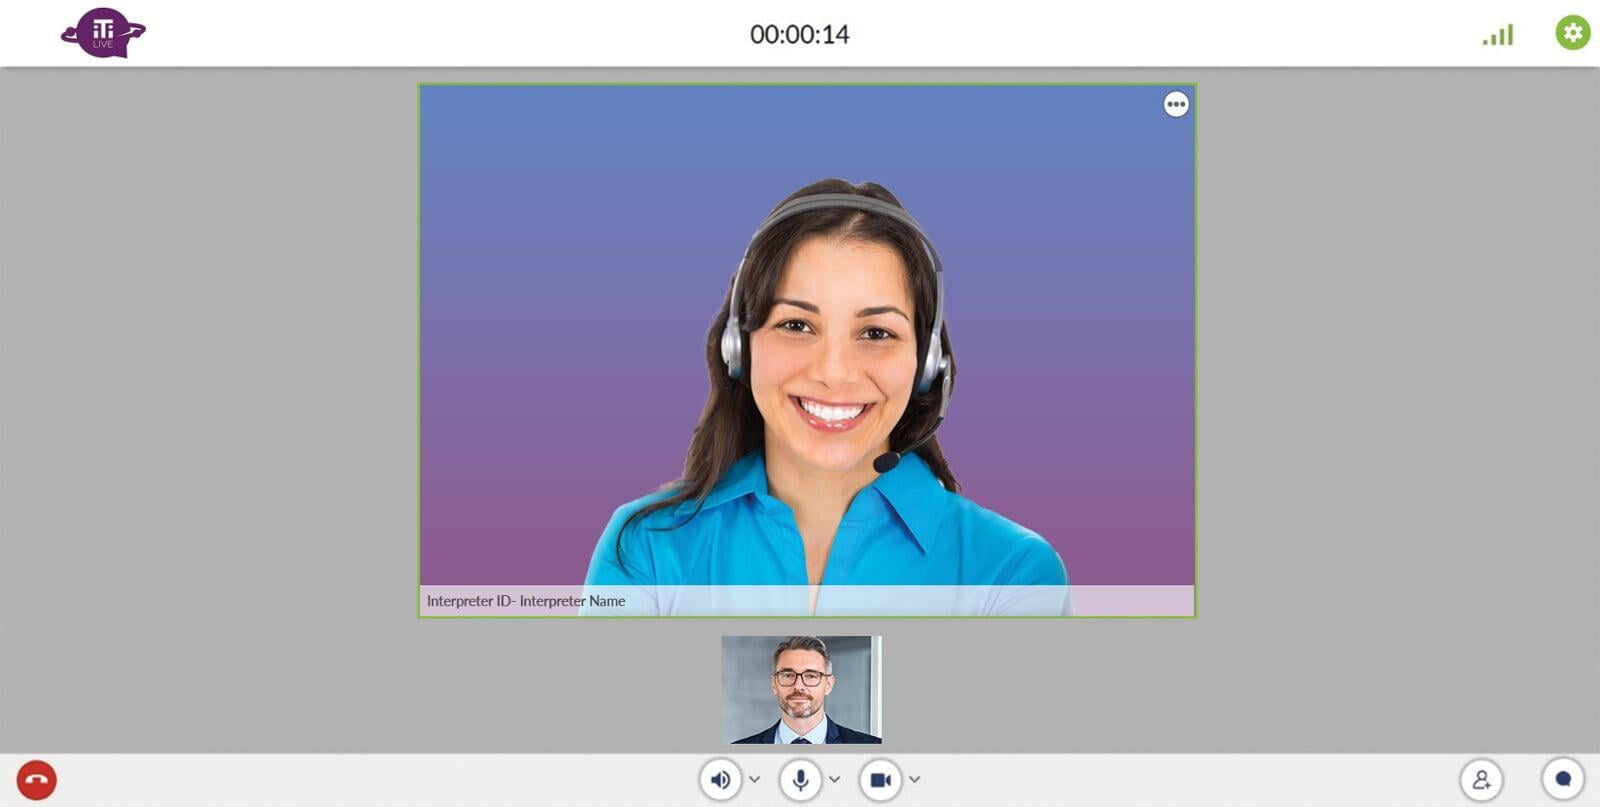
Timer
Timer
The Timer is located at the top center of your screen, and lets you and all participants know how long the session is taking. The Timer will count up until the session ends.
Interpreter View
Interpreter View
The interpreter will appear on video in the center of the screen (labeled with their Interpreter ID and First Name). If there are multiple participants in the session, each participant will appear side by side. The only name that will be displayed is the interpreter’s name. A third or fourth party will display as Guest1, Guest2, and so on.
Three Dot Menu
Three Dot Menu
Click the three dot menu on the top right of any participant’s screen to reveal more options.
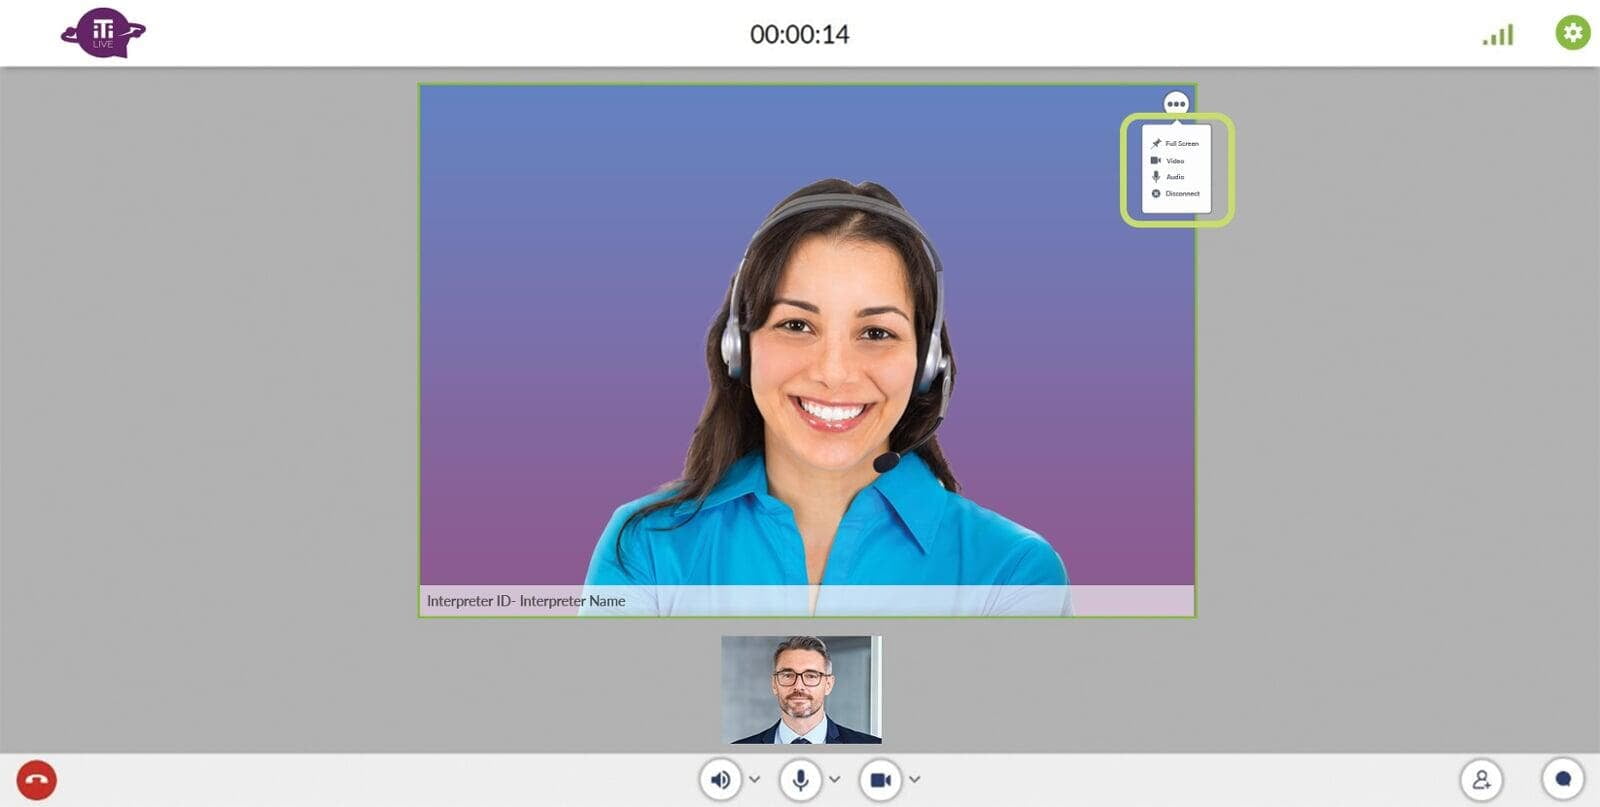
Full Screen
Full Screen
Full Screen mode enlarges a participant’s video to full screen.
- Click the Pin icon to enlarge a participant’s video screen.
- Click the Pin icon again to minimize a participant’s video screen.

Video
Click the Video icon to mute the video of a participant.
Note: As the host, you can mute the video of a participant, but you cannot unmute their video. If you mute other participants, they will need to unmute themselves to continue the session or clarify any need to unmute themselves to continue the session or clarify any need to unmute themselves to continue the session or clarify any need to unmute themselves to continue the session or clarify any need to unmute themselves to continue the session or clarify any instructions.
We recommend having a discussion with the participant who you want to mute before doing so.

Audio
Click the Audio icon to mute the audio of a participant.
Note: As the host, you can mute the audio of a participant, but you cannot unmute their audio. If you mute other participants, they will need to unmute themselves to continue the session or clarify any need to unmute themselves to continue the session or clarify any need to unmute themselves to continue the session or clarify any need to unmute themselves to continue the session or clarify any instructions.
We recommend having a discussion with the participant who you want to mute before doing so.

Disconnect
Click Disconnect to disconnect a participant from the session. It will not end the session for all participants.end the session for all participants.end the session for all participants.end the session for all participants.
Speaker, Microphone, and Camera
Speaker, Microphone, and Camera
Your Speaker, Microphone, and Camera controls are located at the bottom of your screen. Please see Section 3 for information on how each functions.
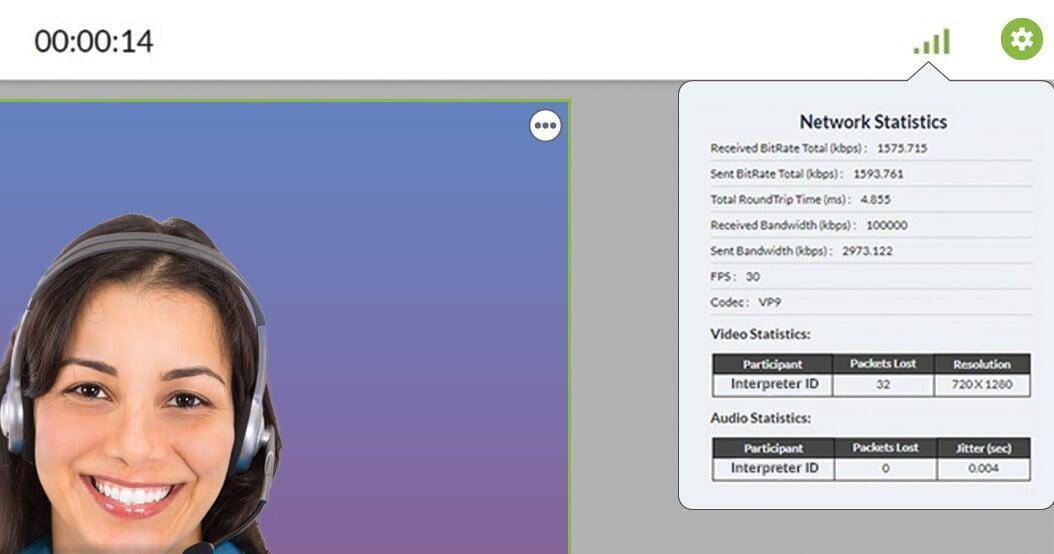
Network Statistics
Network Statistics
To access the Network Statistics of your current session, click the Green Bar icon located at the top right of your screen. If you’re having connection or video issues, your Network Statistics can help your IT Department identify the problem.
Invite Participants
Invite Participants
Add participants or another interpreter into a session using the Invite Participants feature. The platform supports up to 5 participants total in one call.
To add a participant(s):
- Select the Plus Person icon on the bottom right of your screen.
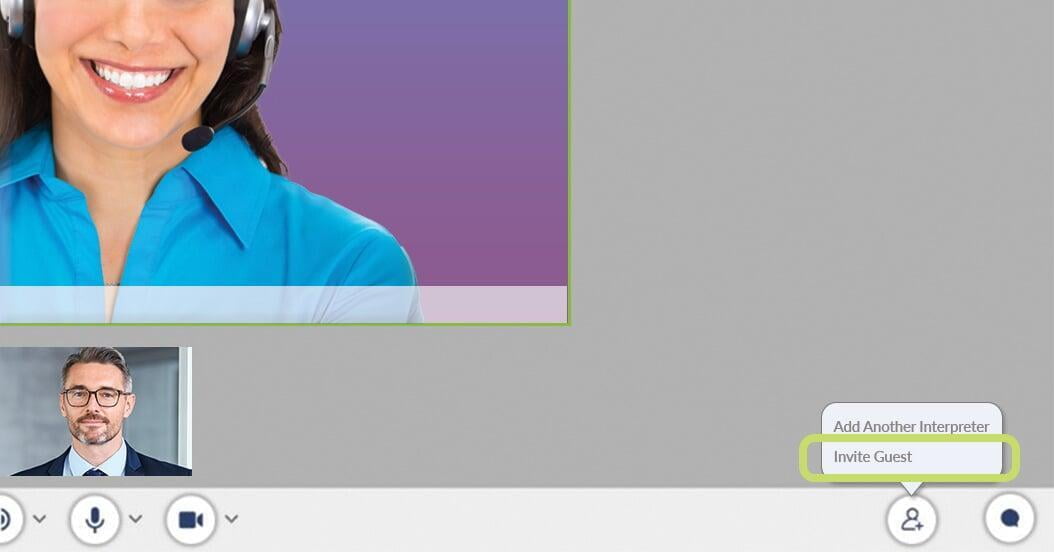
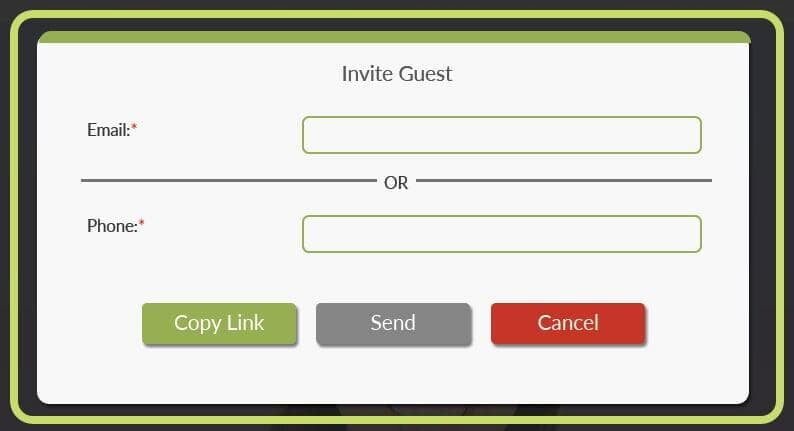
- Choose Invite Guest.
- Enter their Email OR Phone Number. Enter the desired 10-digit phone number without characters (e.g., 9995552424).
Note: Copy Link will copy the link to your clipboard and allow you to send the invitation another way.
- Click Send.
Note: If the Send button is grayed out, you still have required fields you need to fill in.
- The invited participant will receive either an email or a text message inviting them to join the session. They will be added to the session as soon as they click the invite link, and confirm they want to join the session.
To add an interpreter:
- Select the Plus Person icon on the bottom right of your screen.
- Choose Add Another Interpreter.
- Choose a language from the Language tiles, or click on the Other tile to see all video languages available.
- Click OK, and the system will automatically search for an available video interpreter in the requested language.
- While the system is searching, you can click Cancel Request at any time and return to your active session.
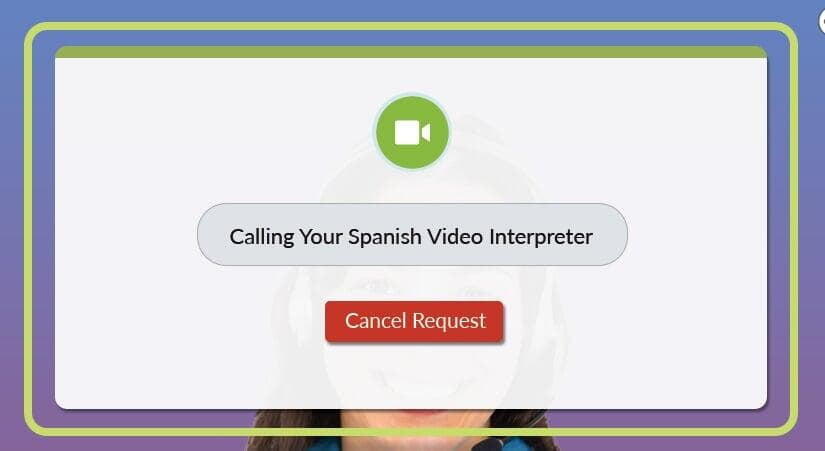
- If an interpreter accepts your request, they will automatically be placed into your session.
Chat
Chat
Communicate in writing to all participants using the Chat feature. It’s located on the bottom right of your screen.
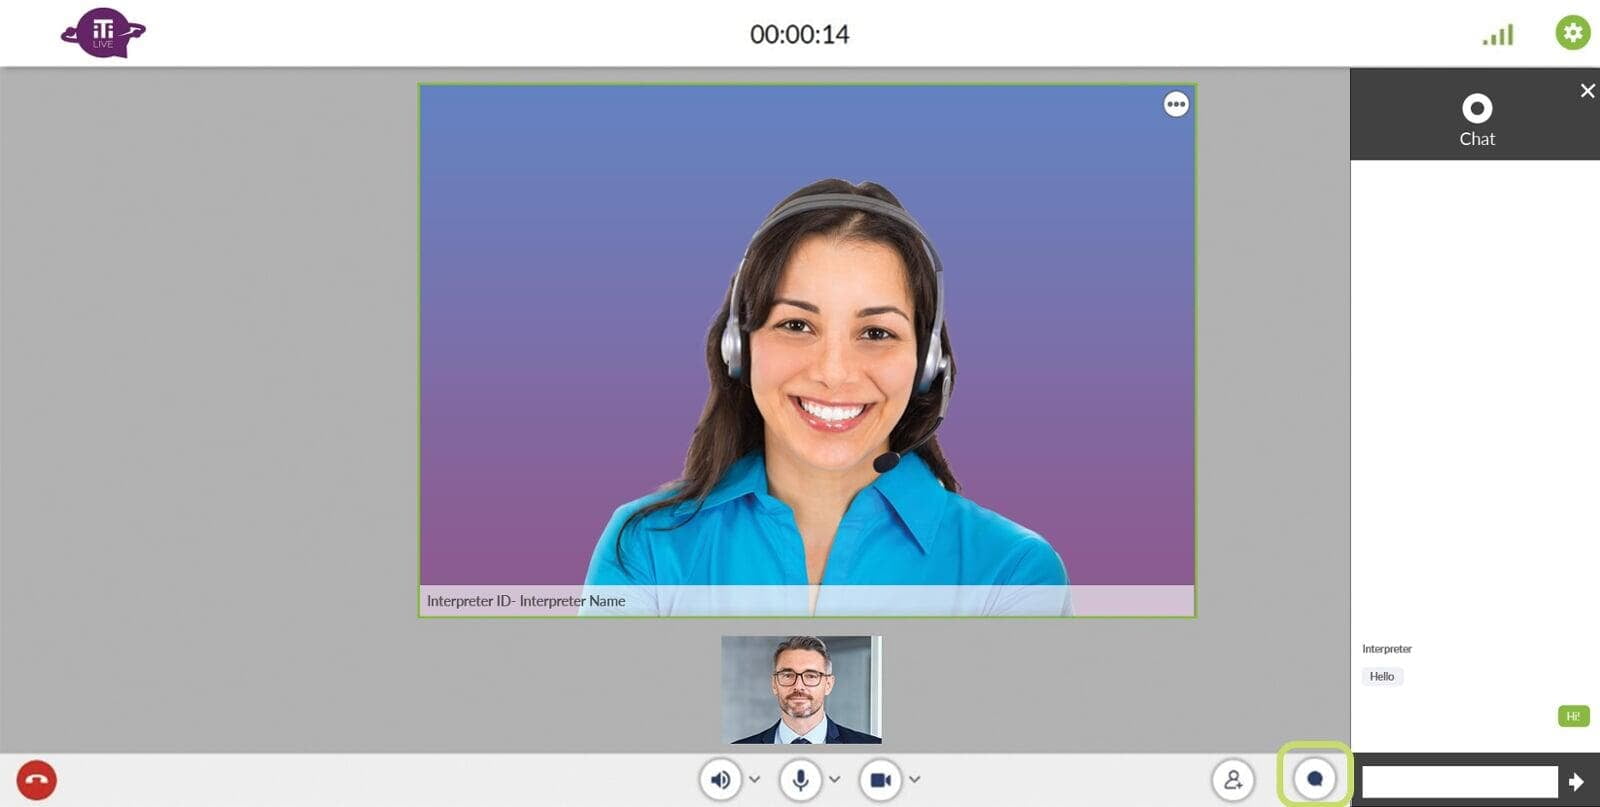
- When you receive a message, a blue indicator will appear with the number of unread messages you have.
- Click the Chat icon to open up the conversation.
End Call
End Call
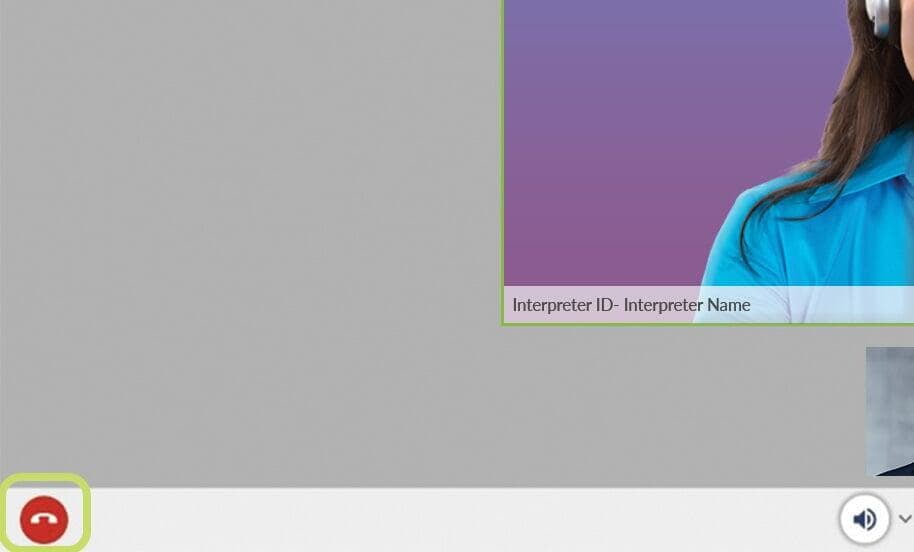
To disconnect all participants and end the call, click the red End Call icon on the bottom left of your screen.
Section 7: Disconnections Caused by Internet Speed
Section 7: Disconnections Caused by Internet Speed
If you (or any other participant) get disconnected because of low bandwidth, the system will try to reconnect you once your bandwidth is re-established.
If the interpreter’s internet bandwidth drops or gets cut off:
- The interpreter’s image will disappear.
- You’ll see a gray screen, and a pop-up message saying, “Interpreter has left the session.”
- The system will automatically try for 30 seconds to reconnect the interpreter to your session.
- If the interpreter is not able to reconnect, you’ll see this message:
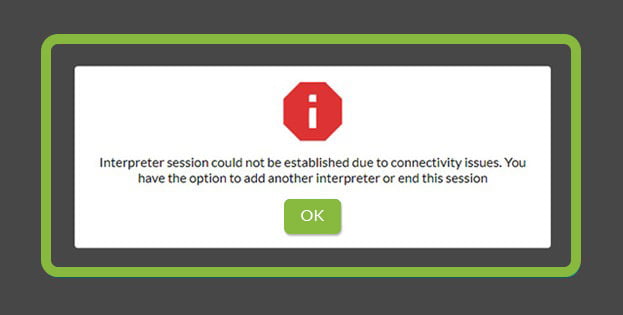
- Click OK.
- Either add a different interpreter into your session via the Plus Person icon, or end the call.
If your internet bandwidth drops or gets cut off:
- The system will try to automatically reconnect you for 30 seconds.
- You’ll see this message:
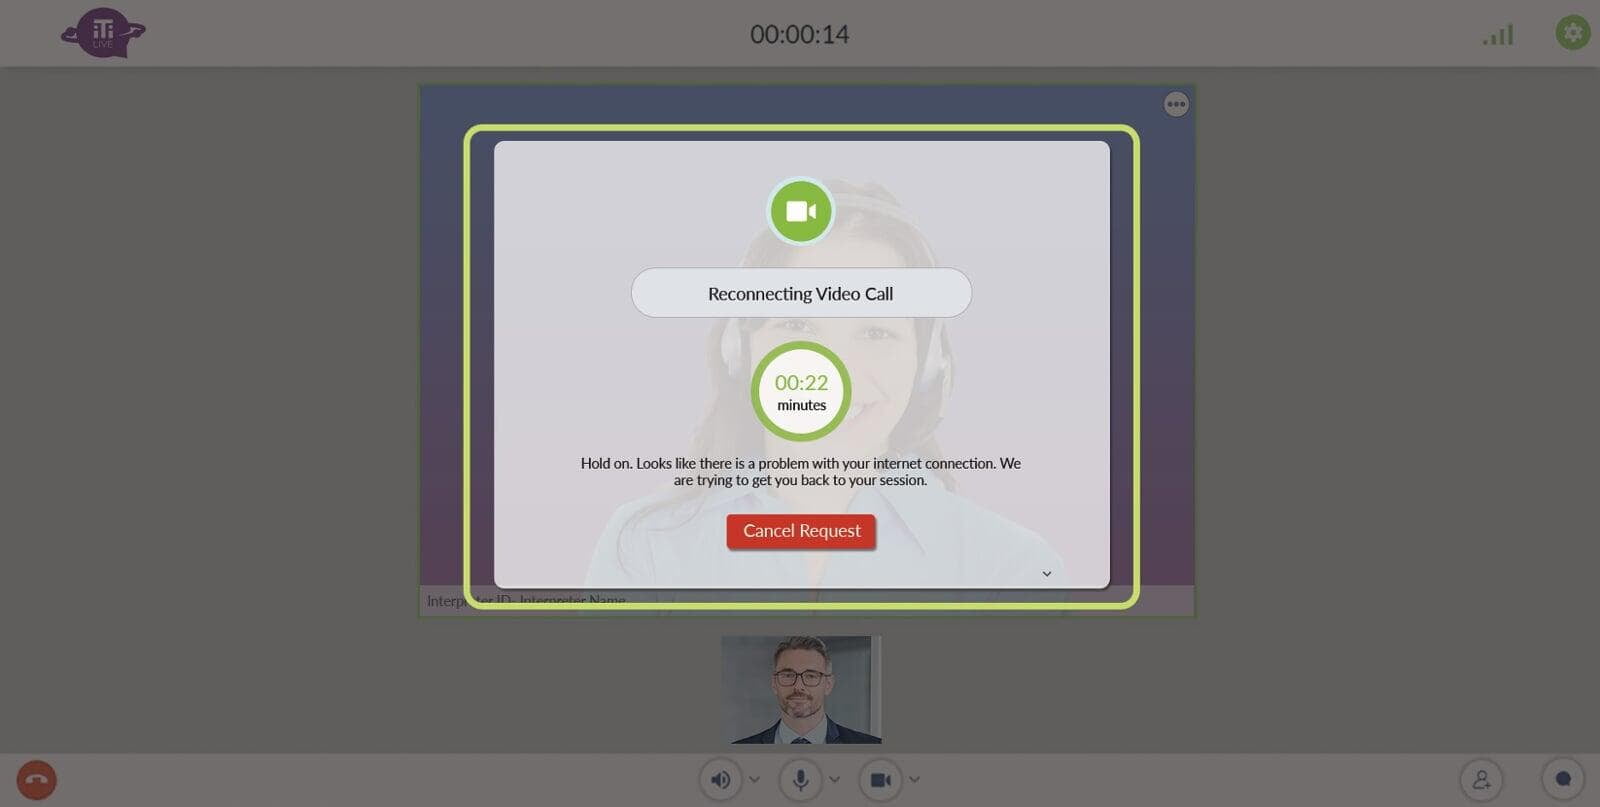
- Cancel Request will end your session and take you to the “Survey” screen.
- If your bandwidth returns to speeds that support a video call, you will be reconnected to the call and can proceed as normal.
- If you are unable to reconnect after the allotted time, you’ll see this message:
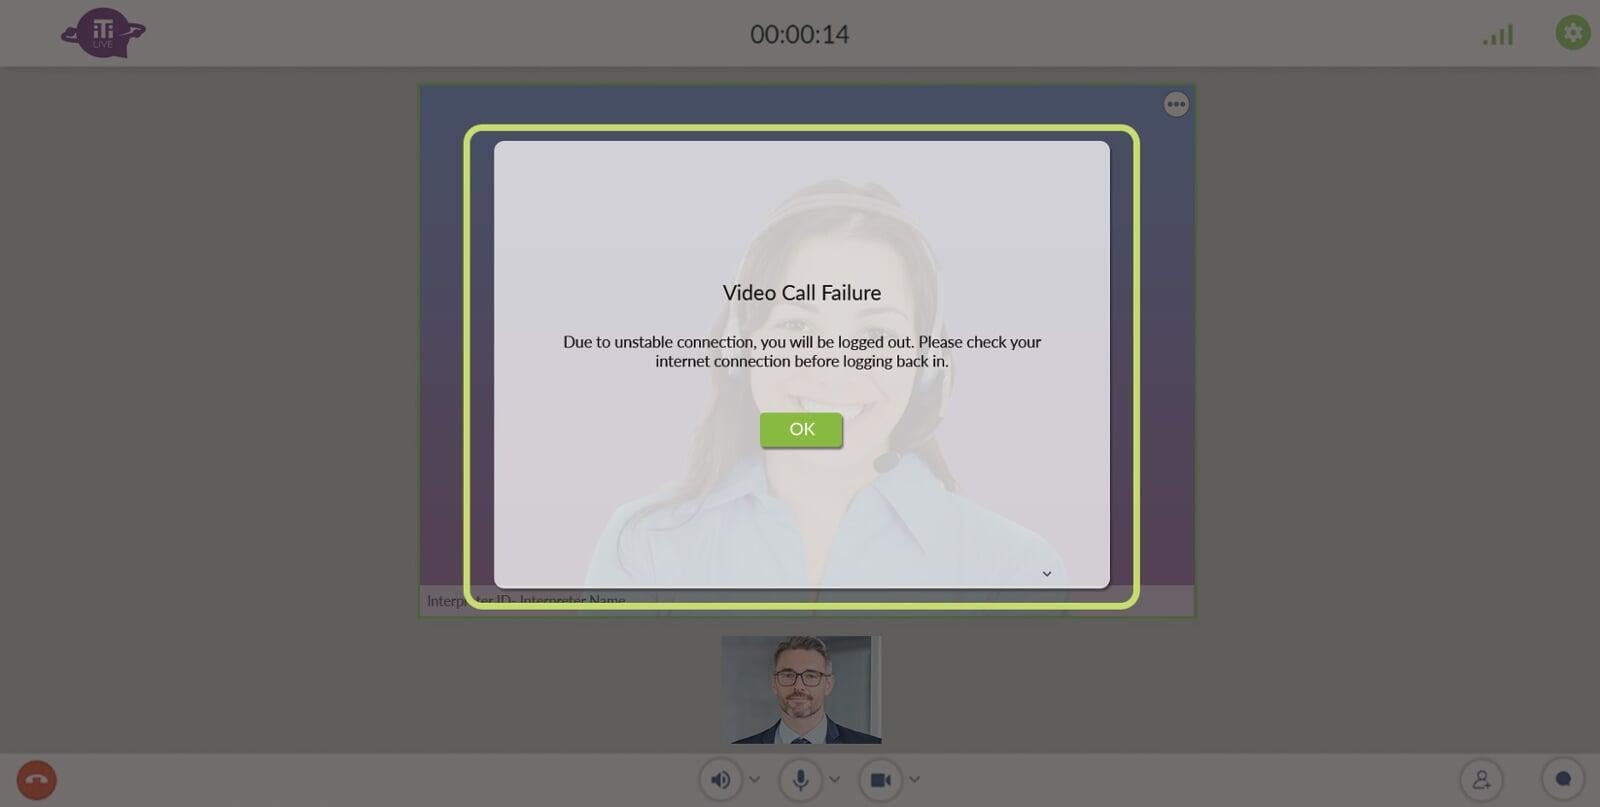
- Click OK to close this window.
- Your session will end, and you’ll be taken to the “Survey” screen.
- Check your bandwidth before trying again or contact your IT Department for assistance.
If an invited participant’s internet bandwidth drops or gets cut off:
- The invited participant will exit the session with the option to rejoin.
- If they rejoin and the session has ended, they will see “This session has ended.”

You can edit text on your website by double clicking on a text box on your website. Alternatively, when you select a text box a settings menu will appear. your website by double clicking on a text box on your website. Alternatively, when you select a text box.
Section 8: Placing an On-Demand Audio Call
Section 8: Placing an On-Demand Audio Call
In addition to on-demand video calls, you can place on-demand audio-only calls through the iTi Live platform.
If you need to add a third party into your On-Demand Audio Call, please see Section 11before placing your call.
To place an audio-only call:
- Fill in the required Organizational Information (the first 1 to 5 fields).
- Select the Language for which you need an audio interpreter from the language tiles, or click Other to view additional languages.
- If your language is not listed in the tiles or dropdown, select Other 200+ Audio Languages under the dropdown.
- Click the down arrow in the Channel field, and select Audio.
- The default for the Schedule field is No. If you’d like to schedule an audio-only call, select Yes.
Note: If you would like to schedule an audio-only call, you can only do so through iTi Live for select languages. To view available languages, please see Section 12 for further details on audio scheduled calls.
- Press Connect, and the system will start looking for an audio interpreter.
Note: If the Connect button is grayed out, you still have required fields you need to fill in.

Section 9: Waiting for an Audio Interpreter
Section 9: Waiting for an Audio Interpreter
Once you’ve made your request for an audio-only interpreter, the system will either connect you directly with an interpreter or connect you with an agent who can help you further.
While waiting, you also have the option to Cancel Request.
Once an interpreter or an agent accepts the call, you’ll automatically be placed into the in-call session
Section 10: Audio In-Call Screen and Meeting Controls
Section 10: Audio In-Call Screen and Meeting Controls
The “Audio” in-call screen will resemble the “Video” in-call screen, but the interpreter video tile will be blank. If your camera is enabled, you will see yourself in the bottom preview screen, as will any third parties you add to the session. The interpreter cannot see you or any third parties, so feel free to mute your video and ask the third party to do so as well.

You have the option to mute the interpreter, but you cannot unmute them. In an audio-only call, the interpreter also cannot unmute themselves. If you mute the interpreter, you will need to disconnect your session and begin again.
Dial Pad
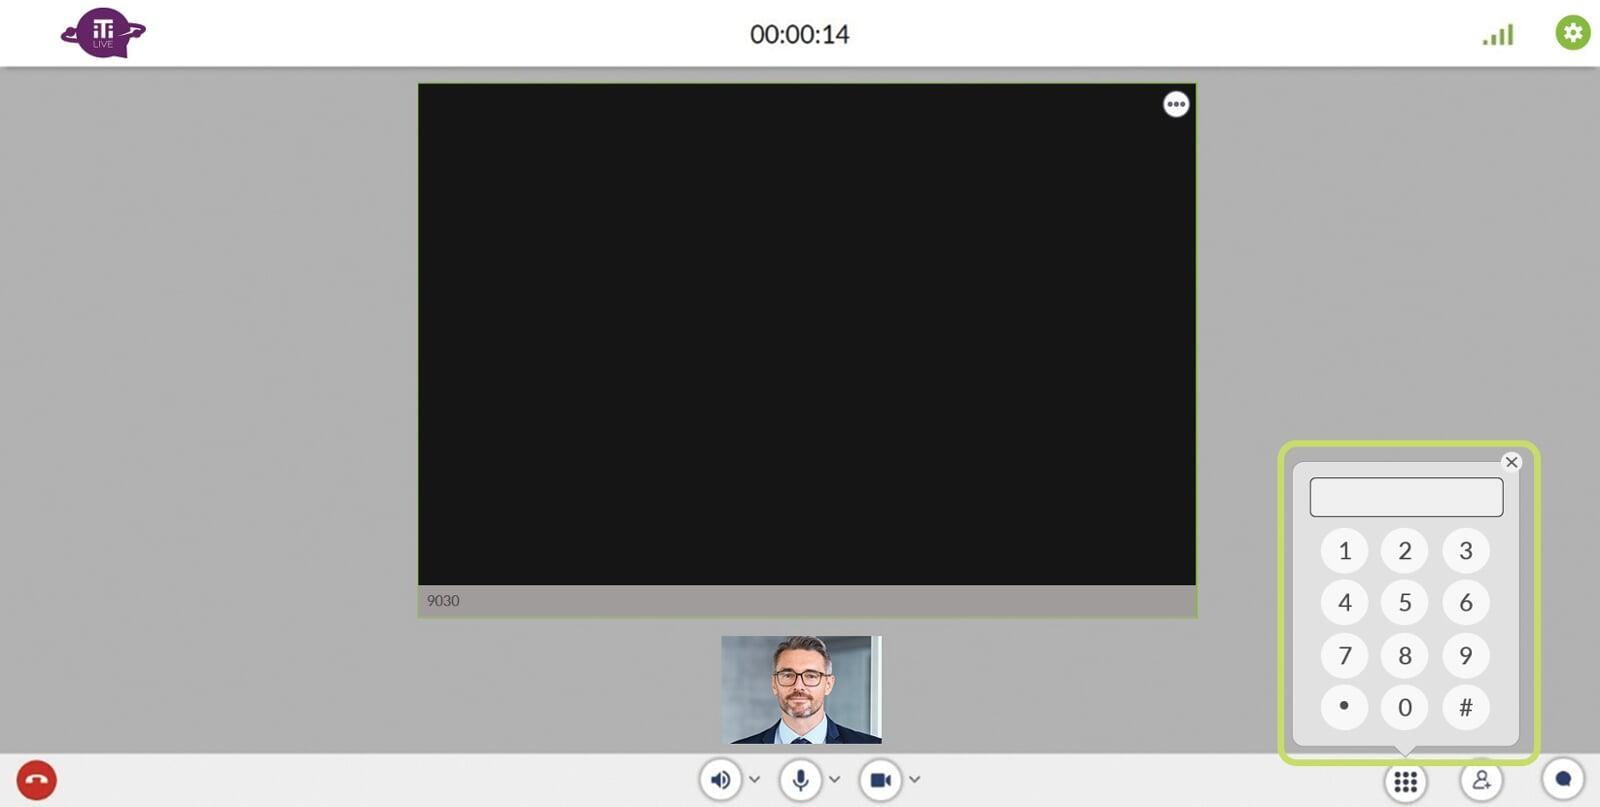
Dial Pad
The Dial Pad feature is only available for audio-only calls and allows the user to add a third party into their audio-only session.
Section 11: Adding a Third Party to an Audio-Only Call
Section 11: Adding a Third Party to an Audio-Only Call
To add a third party into an Audio-Only call you must place your call by selecting Other 200+ Audio Languages when choosing your language on the home page, even if you need a language listed in the platform.
- Select Other 200+ Audio Languages when choosing your language on the home page, even if you need a language listed in the platform. This option will automatically direct your call to a customer service representative, who will need to input the phone number into our system before you reach an interpreter.
- When the agent answers, let them know you need to add a third party into the call.
- The agent will ask for the number of the party you want to reach, enter the number into our system, and connect you with an interpreter.
- Once the interpreter is connected, the agent will drop off the call.
Note: You’ll hear voice prompts after the agent drops off the call to pave the way as you move through the process.
- Tap the Dial Pad icon in the bottom right corner.
- After briefing your interpreter, you can press # at any time using the dial pad, and our system will dial the number of your third party automatically.
- You’ll hear voice prompts to pave the way as you move through the process.
If you connect to an interpreter without speaking to a customer service representative and you need to add a third party to your Audio-Only Call, you will need to disconnect and reconnect following the steps in this section, end your session and begin again.
Section 12: Scheduling an Audio or Video Call
Section 12: Scheduling an Audio or Video Call
Schedule audio or video calls in advance through the iTi Live platform using the Schedule feature.
To schedule an audio or video call:
- Fill out the required information on the main screen, including Organizational Information, Language, and Channel.
- Select Yes under Schedule.
- Click the Schedule button to proceed.

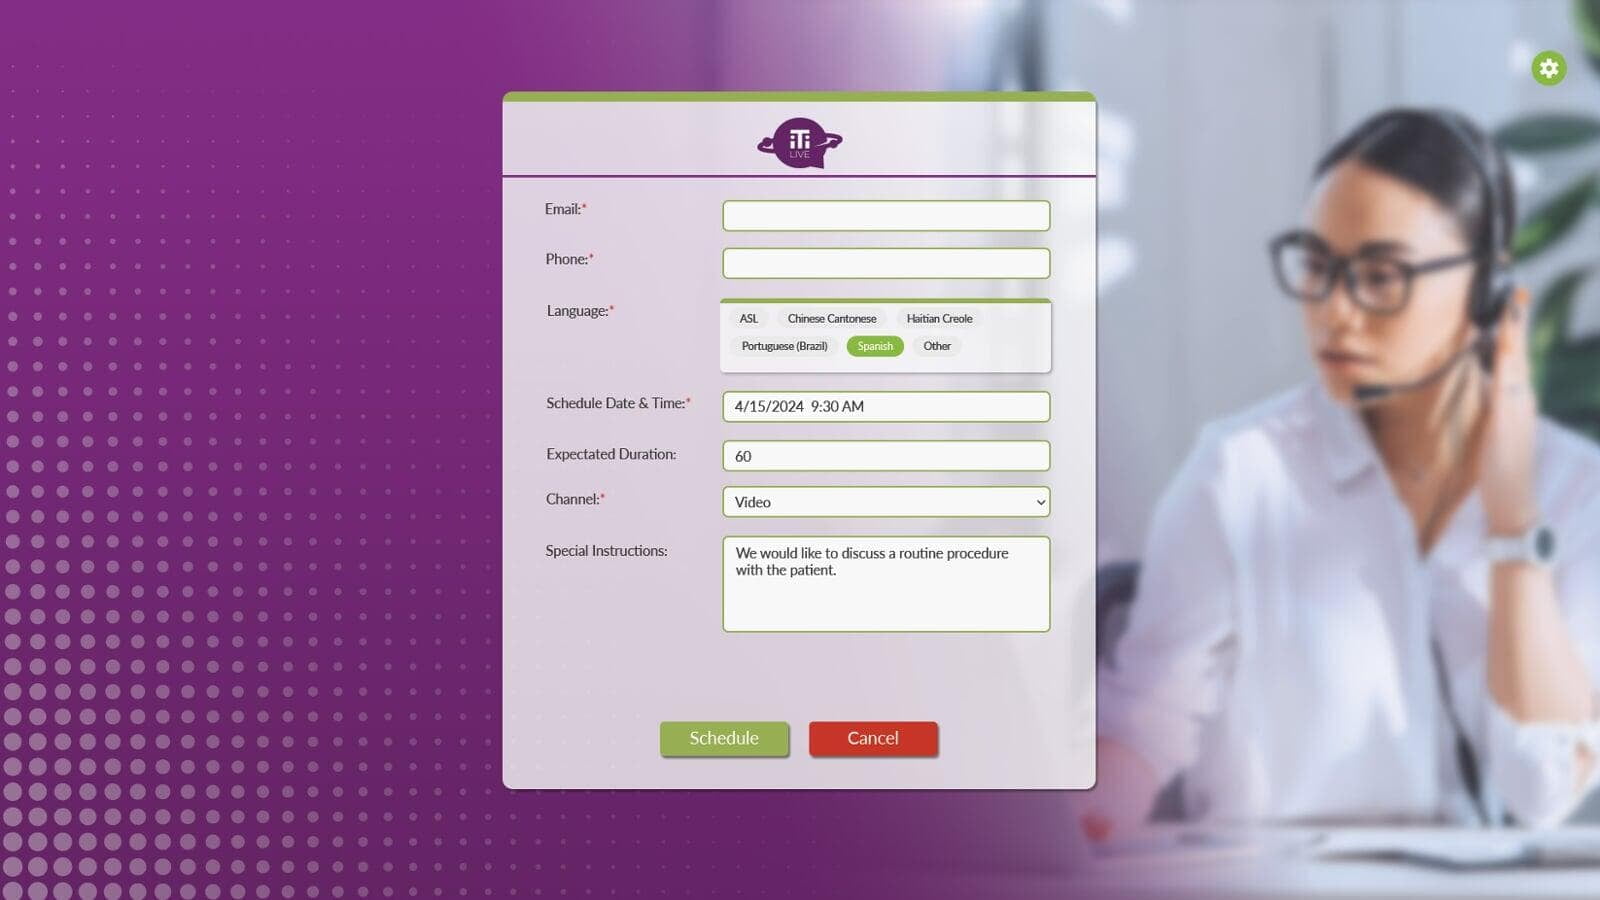
You will be taken to another screen, where you will need to provide some additional information.
- Enter your Email.
- Enter your Phone Number.
Note: Be sure to provide an Email and Phone Number you have access to, otherwise you will not receive the information necessary to attend your prescheduled session.
- Confirm the Language you need.
- Choose the Schedule Date & Time for which you want to schedule your call.
- Enter the Expected Duration of the call (optional).
- In the Special Instructions section, enter any information that will help provide the interpreter context for the call, as well as any specific needs or topics (i.e., if the interpreter should be a certain gender, if the call is for reproductive health, etc.).
- Press Schedule.Note: If the Schedule button is grayed out, you still have required fields you need to fill in.
- Click Cancel at any time to return to the “Billing” screen.
You must schedule your call at least 12 hours in advance.
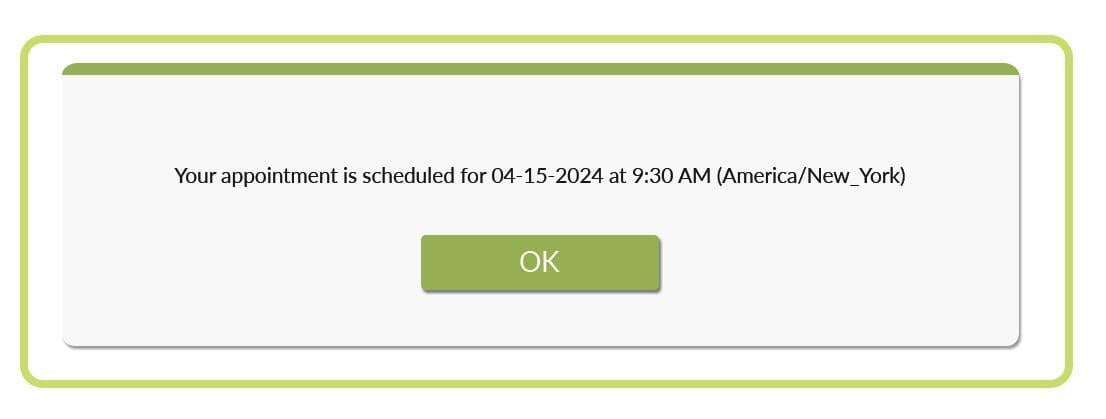
You’ll receive an automated email once your request is placed that includes the date, time, and language for your appointment. You’ll also receive a reference number.
This email is not confirmation that an interpreter has been secured. We will email you again when an interpreter has accepted your request and the appointment is confirmed.
We do our best to secure a video interpreter up to 24 hours before your appointment, but if we are unable to do so, we will send a notification to the email address you provided when you submitted the request for a scheduled interpreter.
Languages Available for Scheduling
Languages Available for Scheduling
All languages listed in the platform are available for scheduling through iTi Live.
If you need to schedule an audio-only call that’s not listed, please phone our call center at 1-800-225-5254 and an agent can help you.
Rejoining a Call
Rejoining a Call
If you are disconnected from a call without clicking the End Call button, you can use the link from your email confirmation to rejoin. Alternately, you can click on the “Have a prescheduled call reference code?” link at the top of the home page, and enter your reference number.
Interpreters will stay on the line for 5 minutes after disconnection. After that, you will need to call an on-demand interpreter or re-schedule.
Cancellations
Cancellations
You can cancel the appointment up until the interpreter is confirmed without incurring a cancellation fee.
You can either phone our call center and cancel, use the Cancel link at the bottom of your confirmation email, or cancel directly in the iTi Live platform.
To cancel directly in the iTi Live platform:
- Log in to the iTi Live platform.
- Click “Have a prescheduled call reference code?” at the top of the home page.
- Enter your reference number (located in your confirmation email) and click Find.
- Click Cancel Session to cancel your scheduled call.
Note: Cancelling a scheduled call after an interpreter has been confirmed may result in a cancellation fee.
If you phone our call center, please have your reference number ready. You’ll receive an email soon after the cancellation is made.
If we are unable to secure an interpreter for your request, you will not be charged.
Section 13: Connecting to Your Scheduled Video Call
Section 13: Connecting to Your Scheduled Video Call
There are two ways to initiate your Scheduled Video Call at the scheduled date and time of your call.
Through your confirmation email:
- Open your confirmation email.
- Click “Connect directly to your scheduled appointment by clicking this link.”
- You’ll be taken directly to your session.
Through the iTi Live platform:
- Log in to the iTi Live platform.
- Click “Have a prescheduled call reference code?” at the top of the home page.

- Enter your reference number (located in your confirmation email) and click Find.
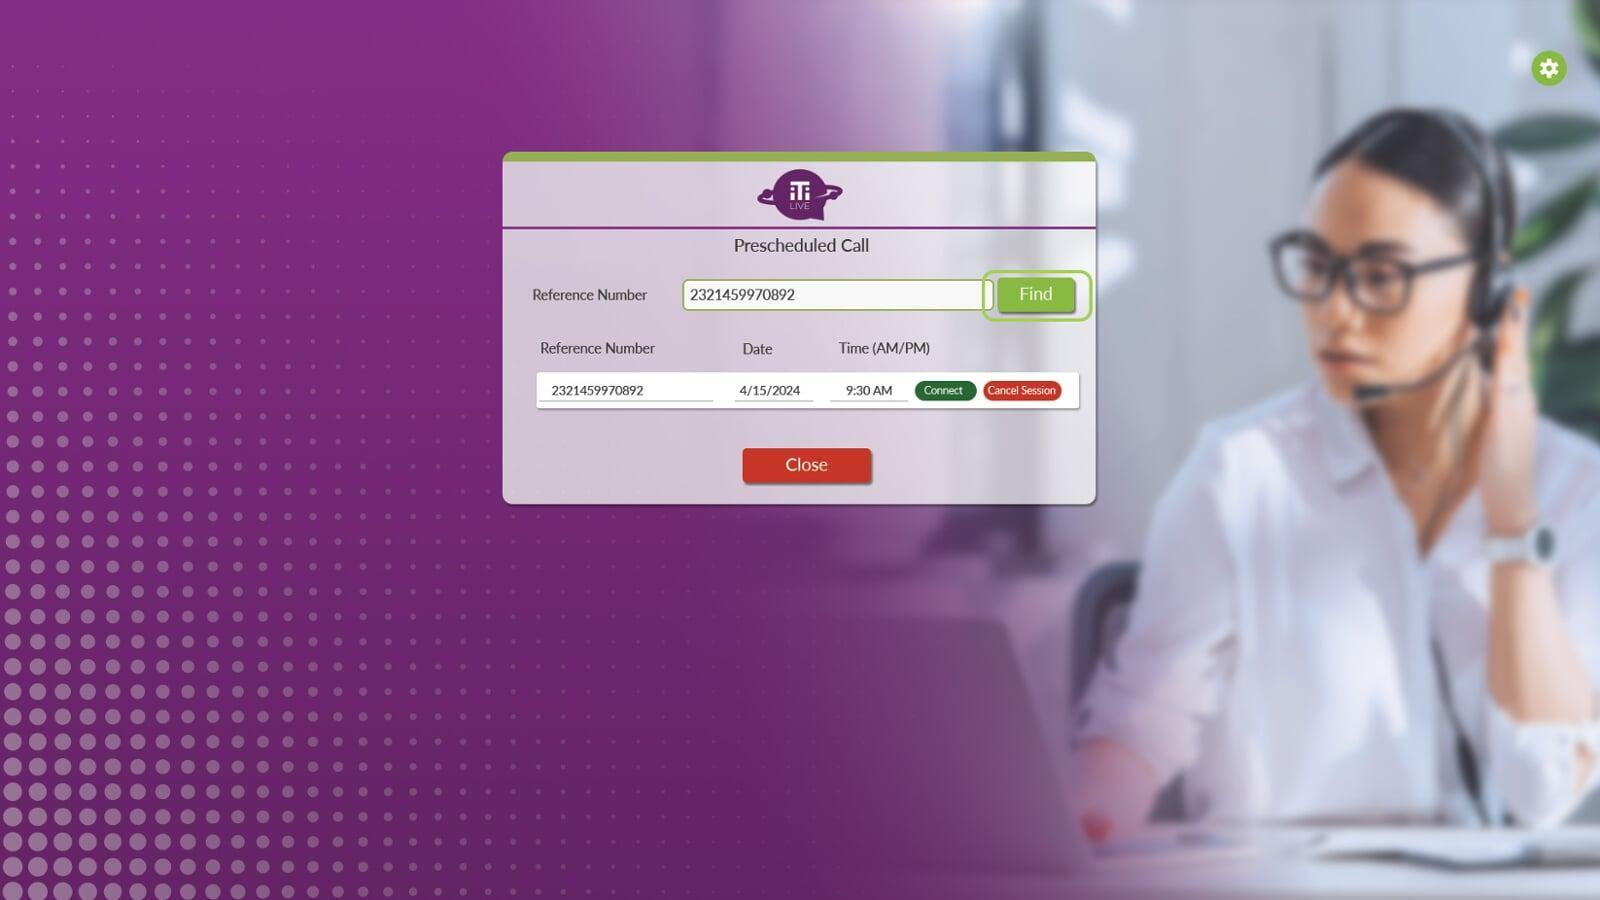
- Click Connect to begin your session.
- Click Close to return to the “Billing” screen.
Note: You can enter your session up to 15 minutes before your scheduled time. The interpreter can join up to 5 minutes before the scheduled time. If you enter too early, you will see this:
Section 14: Connecting to Your Scheduled Audio Call
Section 14: Connecting to Your Scheduled Audio Call
There are two ways to initiate your Scheduled Audio Call at the scheduled date and time of your call.
Through your confirmation email:
- Open your confirmation email.
- Click “Connect directly to your scheduled appointment by clicking this link.”
- You’ll be taken directly to your session, and a customer service representative will greet you.
- Let them know you have a scheduled call. Have your reference number ready just in case.
- Once the agent connects you with your audio interpreter, they will drop off the line, and you can begin your session.
Through the iTi Live platform:
- Log in to the iTi Live platform.
- Click “Have a prescheduled call reference code?” at the top of the home page.
- Enter your reference number (located in your confirmation email), and click Find.
- Click Connect.
- You’ll be taken directly to your session, and a customer service representative will greet you.
- Let them know you have a scheduled call. Have your reference number ready just in case.
- Once they connect you with your audio interpreter, they will drop off the line, and you can begin your session.
Section 15: Survey Screen
Section 15: Survey Screen
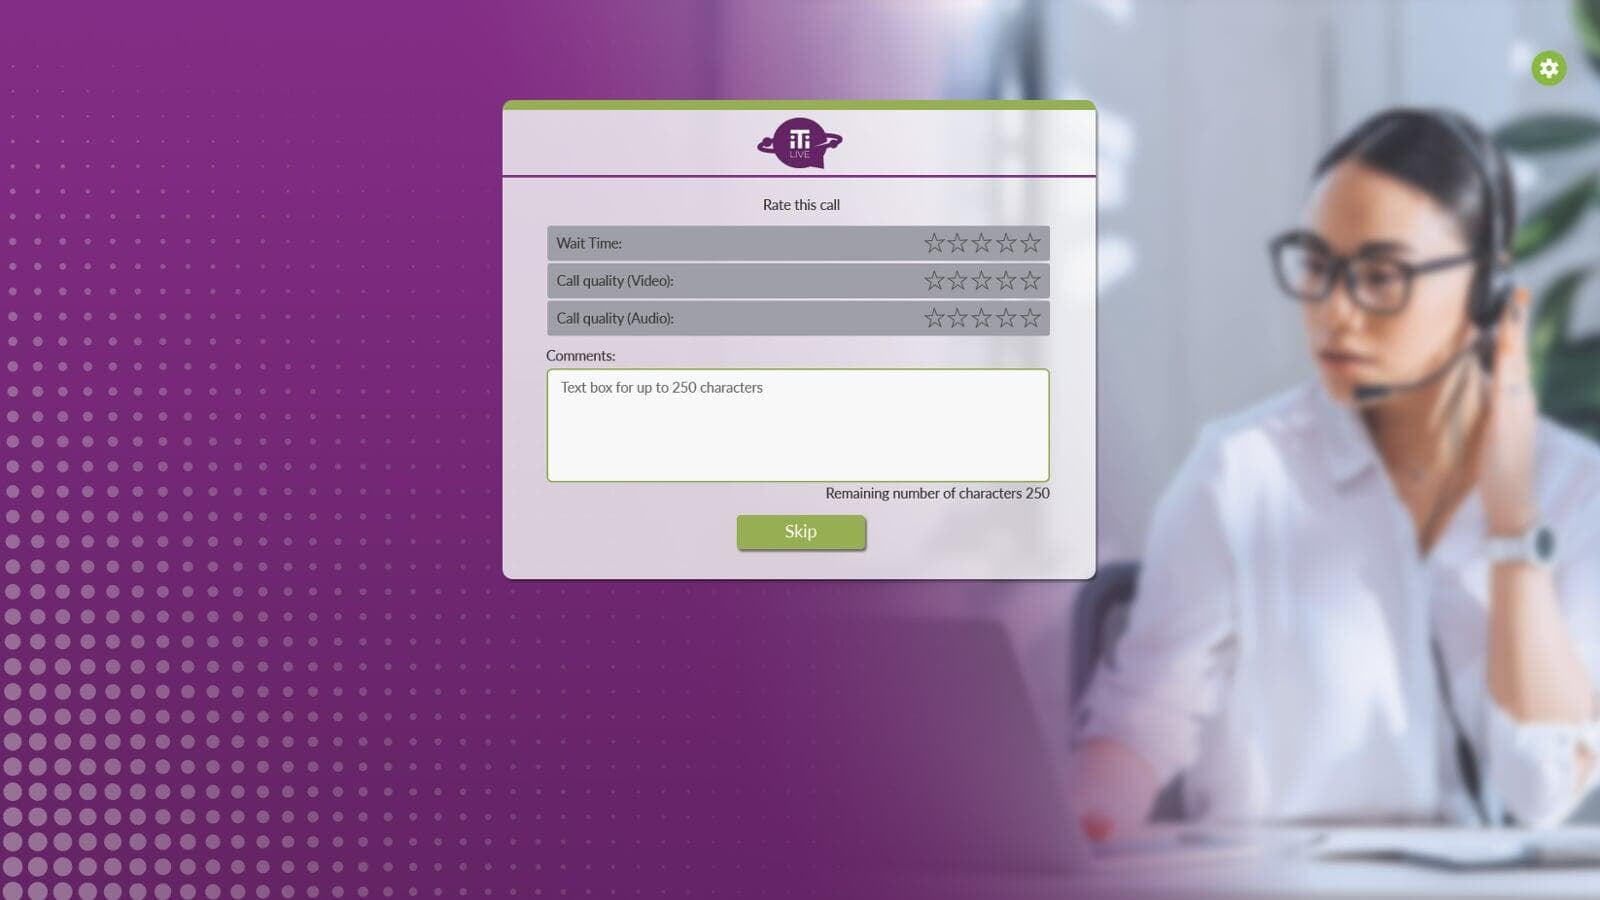
When an audio or video session ends, you’ll be asked to Rate the Call. Fill in the stars for Wait Time, Video Quality, and Audio Quality. We also encourage you to type in any comments.
If you would rather bypass this step, select Skip to return to the home page.
Section 16: Settings Menu
Section 16: Settings Menu
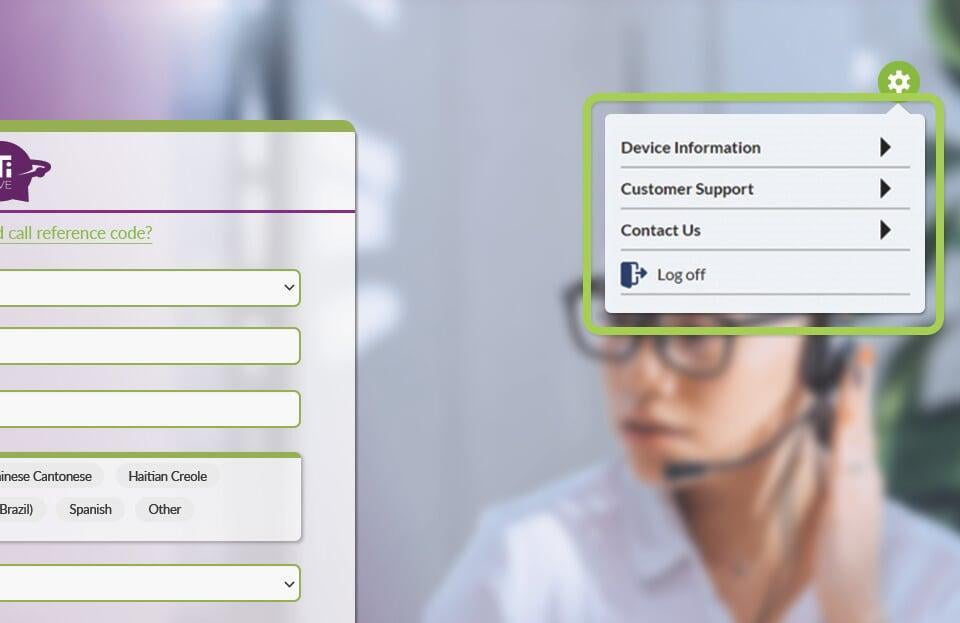
View Device Information, Customer Support, and Contact information through the Settings cog at the top right of the iTi Live home page.
Device Information
Device Information
Shows your device information, including Device type, Operating System, and Browser.
Customer Support
Customer Support
The “Getting Started” guide will help you explore the features available to you in the iTi Live user portal. Clicking on this link will direct you to an external website.
The “Frequently Asked Questions” page covers common questions we receive about using the iTi Live user portal. Clicking on this link will direct you to an external website.
The “Connection Test” tool makes sure your Operating System, Browser, and Internet Speed are sufficient to run a video session.
Contact Us
Contact Us
If you need assistance, please click Email Us to send us an email, or give us a call at 860-288-5390.
If you need to report an issue, click Report an Issue. You’ll be directed to a form. Fill out the form, and someone from our Help Desk will be in touch. Clicking on this link will direct you to an external website.
Log Off
Log Off
Choose Log off to exit iTi Live.
If you need to report an issue, click Report an Issue. You’ll be directed to a form. Fill out the form, and someone from our Help Desk will be in touch. Clicking on this link will direct you to an external website.
Appendix A: How to Dial Out to a Third Party
Appendix A: How to Dial Out to a Third Party
Choose Log off to exit iTi Live.
If you need to report an issue, click Report an Issue. You’ll be directed to a form. Fill out the form, and someone from our Help Desk will be in touch. Clicking on this link will direct you to an external website.
How It Works
How It Works
Once connected to a CSR, let them know you need a third-party dial-out.
The CSR will ask for the number of the party you want to reach, enter the number into our system, and connect you with an interpreter.
Once the interpreter is connected, the CSR will drop off the call.
After briefing your interpreter, you can press # at any time, and our system will dial the number of your third party automatically.
You’ll hear handy voice prompts to pave the way as you move through the new process.
Quick Prompts
Quick Prompts
- To connect to your third party or to redial that number, press #
- To disconnect from the third-party call, press 8
- If the interpreter drops unexpectedly before your call is complete, press 9 to transfer back to the call center
- To disconnect all parties and end the call, press star or hang up
A CSR Can Assist You in These Situations
A CSR Can Assist You in These Situations
There are certain call scenarios where a CSR will need to manually dial a third party for you:
- If you need to dial internationally*
- If you need to call more than one number*
- If the number has an extension*
- If your phone does not have a dial pad
*You can still press 9 to transfer back to the call center.
Tips for Various Call Scenarios
Tips for Various Call Scenarios
- If you’re using interactive voice response (IVR): IVR is not compatible with our third-party dial-out automation. None of the prompts, specifically transferring back to the call center, will work if you connected to an interpreter through IVR.
- If the number dialed results in someone answering: The third party is connected into your conference call with the interpreter, and the interpreting session can begin.
- If the number dialed results in a busy signal or no answer: You will hear a message saying, “Your party could not be reached, or there was an error connecting your call.” You can then follow the prompts according to what you wish to do next, such as press # to redial the number.
- If the number dialed results in a voicemail: You’ll have two options.
- The interpreter can leave the message as discussed during the pre-session conference. You can then press * to end the call or hang up.
- If you want to try the number again, press 8 to disconnect from the voicemail and then press # to re-dial the number.
- If the interpreter drops unexpectedly before your call is complete: Press 9 to transfer back to the call center if you still need an interpreter for the customer on the existing order. Otherwise, press * to end the call. If no buttons are pressed after the interpreter disconnects, the call will end for all parties in 15 seconds.
- If you need to speak with a CSR or you need a different interpreter for your customer on the same order: Ask the interpreter to disconnect from the call and then press 9 to transfer back to the call center. Note: You will not be able to transfer back to the call center until after the interpreter disconnects.
- If you need to request an interpreter for a new customer: Press * to end the call or hang up, and then dial your number again to begin a new session.
